This is a little bit of info regarding "How To" carry out the task of fitting a letter box but remember there are very many different styles and fittings for letter boxes, above all be careful when measuring and cutting the aperture, DirectDoors.com stock top quality door furniture including letter boxes, locks and handles.
Video showing how to cut out an aperture for a letter plate:
Your browser may not meet the minimum requirements to view YouTube videos. Please refer to this document for more information.
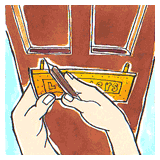
1.  The easy bit, take the letter box and mark lightly around the edge of the plate, make sure you cut to the inside of this line by a few millimetres, always check the position of the fixing bolts or screws, in old style letter plates position the plate and hit the face of the plate with the palm of your hand to allow the bolt positions to mark the door, drill through these positions before cutting out the aperture as described below. See item 2 and 4 below.
2.  Cut out the wasted wood by using a jigsaw or padsaw. To help start this off, drill small holes at opposite corners of the template drawing, remember to use a timber block on the opposite side of the door and at the position where the drill will appear to prevent the door splintering.
3.  Mark where the fixing bolts will be positioned, some letter plates such as the type we sell are screw fixed rather than bolt fixed.
4.  Drilling the holes for the fixing bolts. Hold a small block of wood on the other side of the door in the same space you are drilling. This will prevent the wood from splintering when the bit passes through. Sand any rough edges. Fix the bolts in position with the fixing nuts. You may need to cut the bolts down at the back if they protrude past the nut. This can be done with a hacksaw.
The light at the end of the tunnel should now be in sight.
Fitting a weatherbar | Glazing